Saturday, April 26, 2014

My Southern I Do's - Bridal Party Flowers

When it came to flowers I knew I didn't want to spend a lot of money! At first I was only going to do babies breath! But then I learned the babies breath that I would need would be the same prices as regular flowers. Good to know! So therefore back to the Pinterest boards for some inspiration.

We will first start with the flowers! For the bridal bouquet I knew I wanted a very soft and romantic look. I loved the pale flower colors with dusty miller.
http://www.pinterest.com/pin/167196204890203862/ 
Thought the idea of monogrammed handkerchiefs around the bouquets was so cute. Not to mention the bridesmaids wouldn't lose their bouquets!
http://www.pinterest.com/pin/167196204889071277/
 I wanted the bridesmaids bouquets to be simple and romantic. Loved the concept of one flower caller with the dusty miller.
http://www.pinterest.com/pin/167196204888124388/
 And we had to some how make the boutonnieres rustic. I loved the twine wrapping the boutonnieres.
http://www.pinterest.com/pin/167196204887377031/

And this is what my wedding flowers looked like! 

I had my bouquet wrapped in burlap and then my Grandmother's handkerchief which she carried on her wedding day. My flower bouquet was muted flowers, babes breath and dusty miller. 

The girls carried bouquets of pink peonies and dusty miller. I also monogrammed handkerchiefs with their initials. I found the handkerchiefs at an antique store that cost $1, and then just took it to a place that monograms. Such a cute detail and very affordable. 


 And can't forget about the boys! I thought the twine on the boutonnieres helped give the wedding a rustic feel.

By Jennifer Shelton

Friday, April 25, 2014

Dinner Ideas - Pesto Baked Ziti

My mother-in-law is still recovering from her hand surgery so I wanted to make something for dinner that was easy to eat (no knives required) and also something that would provide them with leftovers. I remember seeing a recipe for Pesto Baked Ziti and decided that I would try it out.

This was SUPER simple to make! Boiling water and making sure the sausage was cooked through was the hardest task!

The only tweaks I would make would be ...

  • Use penne instead of ziti. I think the cheese and sauce would cling to the penne better. 
  • In the directions they tell you to layer the pasta, meat, and cheese. I think stirring it in together would make me it slightly easier to serve and make sure you get even distribution of ingredients!

This recipe is from The Neelys and you can find it on my Pinterest Page.


SHOW: Down Home with the Neelys
EPISODE: That’s Amore

Ingredients:

  • Salt
  • 1lb ziti - (I personally am a huge fan of DeCecco pasta!)
  • 1lb hot Italian turkey sausage, casing removed - I used regular Italian sausage
  • 1 medium onion, chopped - to make things simpler I bought chopped onions at the grocery store (they were on sale!!)
  • 3 cloves garlic, chopped
  • 1 (28-ounce) can diced tomatoes - debating on if next time I would add a 1.5 cans
  • 6 ounces of pesto (I really should have made this homemade but I was being lazy!)
  • 1 (9-ounce) package of washed spinach
  • Butter, for baking dish
  • 2 cups shredded mozzarella, plus more for topping
  • 1 1/2 cups grated Parmesan, plus more for topping
Directions: 
  • Preheat Oven to 375 degrees
  • Make pasta (remember to salt your water!!) and drain in colander
  • In a large skillet over medium heat, sauté sausage. Add onion and garlic and sauté until sausage is cooked through. Make sure to break up the sausage so it resembles ground beef. Add the can of tomatoes and pesto. Let it simmer for 10 minutes. 

  • While the sauce is simmering, in a separate bowl mix the spinach, ricotta, mozzarella and parmesan in a separate bowl. 

  • Butter a 4-quart baking dish, add the pasta, then sausage mixture and cheese mixture. Top with a sprinkle of mozzarella and Parmesan. 

  • Bake completely through and golden and crisp on top, about 20 minutes. 

Would love to hear if you liked this recipe and any ideas on how to make it better!

Happy Pinning!
By Jennifer Shelton

Thursday, April 24, 2014

Sur La Table - Cheese Making Class


Do you see those Pinterest posts about making your own ricotta, mozzarella cheese, etc? Or how dreamy do all those pictures of burratta look? I am obsessed with cheese by the way.
http://www.pinterest.com/pin/167196204888670640/
http://www.pinterest.com/pin/167196204888657865/


Since I was moving out of Boston's North End to North Carolina I was determined to learn how to make my own mozzarella/burrata and pasta (pasta post to come!!), since I wouldn't be able to run across the street to one of the amazing shops. My favorite shop was Monica's. This place was amazing. My husband wants to open one in Charlotte one day. The people working there are so incredibly nice and they have the best homemade cheeses, pastas, italian meats, etc. They also have 2 restaurants in the North End. My favorite is Monica's Trattoria which is diagonally across the street. It is really small and cozy but the food is delicious. It is a neighborhood gem. Definitely try out there risottos of the day, or if they have the squid ink pasta!!

http://www.monicasboston.com/#


Anyway, the point of this blog post is to talk about how easy it is to make homemade ricotta! The mozzarella and burrata aren't hard but definitely take more time and you need to get the stretching technique down before you get store quality mozzarella.

During the Homemade Cheese Workshop class at Sur La Table they gave us the following overview of the process, basics, tips and how to make ricotta which I wanted to share! These classes are awesome. They are about 3 hours long but that also includes sampling of what you are making. In this case we not only had our yummy ricotta, mozzarella and burrata, but we also had pasta to go with it!!

These directions were adapted from the Sur La Table Homemade Cheese Workshop pamphlet, and they used Ricki Carroll Home Cheese Making book as a reference.

Don't be scared by the process or technique tips. I just included them because I thought they were interesting and I can be a slight food nerd!

Cheese making Process: 

  • Cheese making is basically the process of removing water from dairy milk
  • First characteristic of cheese is based on how much water is removed (ex. Soft cheeses contain more water, while parmesan hardly contains any water)
  • Milk is mostly water, and what remains is fat, protein, lactose and minerals. 
  • You can use lemon juice or vinegar which is the simplest method to create an acid, or you can use a bacteria to create an acid in the milk. The preferred method is bacteria since it provides flavor and character. Both ways to use the acid cause the milk to coagulate into curds. 
  • Basic ingredients for making cheese are milk, start culture/or natural acts, and an enzyme like rennet to aid in separating portends from water. 
  • Sur La Table, William Sonoma and other stores actually sell cheese making kits where all you have to buy is milk. But you can also buy the ingredients on Amazon if you have a good and reliable instant-read thermometer. 
Cheese making Tips/Basics: 
  • Sterilize all tools and make sure that everything is clean including your counter tops and cheesecloth. 
  • Make sure to use the best quality dairy products. 
  • Pasteurized milk or cream works well but don't use ultra-pasteurized. You can usually find pasteurized milk at Whole Foods. Best way to tell if your milk is ultra-pasteurized is by the "sell by" date, if the date is 3 or more weeks from purchase date then it is most likely ultra-pasteurized. 
  • Pay special attention to time and temperature! A few degrees off and it can totally make a difference. I learned this when we were making our mozzarella. 
  • Definitely invest in a reliable instant-read thermometer. You need to know the exact temperature! 
  • Use a large, heavy bottomed, high quality pot for heating milk. This will help to prevent scorching and ensure even heating. 
Homemade Ricotta: 

In Italian, "ricotta" means "re-cooked", which refers to the process from which it was made. The whey drained from making mozzarella was reheated and strained again to make ricotta cheese. For a richer, creamier cheese, replace party of the milk with 1/2 to 1 cup cream or half-and-half. 

Recipe Yield: 10 to 12 ounces
Ingredients: 
  • 8 cups whole milk (no ultra pasteurized)
  • 1/2 to 1 teaspoon cheese salt (could also use very fine sea salt)
  • 2 cups buttermilk, preferably whole milk (remember the flavor comes from the richer ingredients!)
Place the milk in a large, heavy saucepan and set over medium-high heat. Cook, stirring almost constantly, until the milk comes to a frothing boil. Turn off the head and, as the bubbling subsides, stir in the salt and buttermilk. Continue gently stirring in one direction until the curds and whey separate. The mixture will slightly resemble thickened buttermilk. The why will still look milky and the curds will be very small. Remove from the stove and let sit, completely undisturbed for about 5 minutes. 

Carefully pour the curds and whey through a cheesecloth. Leave the curds in the strainer for about 15 to 30 minutes depending on how dry you would like your ricotta. 

Use immediately or store in the refrigerator for up to 5 days in a sealed container. 

http://www.pinterest.com/pin/223561568971924541/

Isn't that super simple? I think this is perfect if you are making any salads with fresh ricotta, or any dishes that feature ricotta. If you are making baked ziti I would still stick to the store bought. This is fun if you can make the ricotta the star of your meal!

Don't be afraid of the make your own recipes on Pinterest. Definitely test these out and who knows they may be better then what you buy at the store. 

Happy Pinning!
By Jennifer Shelton


Tory Burch Friends and Family Sale

In case you love Tory Burch as much as me, check out the Tory Burch Friends & Fans Event! 25% off your purchase with the code Friendly.  Make sure to hurry the sale ends on April 28th.
Shop Now: http://bit.ly/1iimW2U
These are a few things I am thinking about getting...

Miller Metallic Sandal - Totally classic and since I bought 3 pairs of Jack Rogers at the Neiman Marcus Last Call sale earlier this week I thought I would switch it up this year and go with the gold Tory Burch sandals.
http://www.toryburch.com/miller-metallic-sandal/50008679.html?prefn1=size&start=25&cgid=shoes-flip-flops&dwvar_50008679_size=10&prefv1=10&dwvar_50008679_color=710

Caroline Ballet Flat - I have these in black and have worn the soles off! These are my favorite style of ballet flats and super comfortable. Thinking of the light pink for spring/summer.
http://www.toryburch.com/caroline-ballet-flat/50008664.html?dwvar_50008664_size=5&prefn1=silhouettetype&start=14&cgid=shoes-flats&prefv1=ballet%20flats&dwvar_50008664_color=615

Printed Cosmetic Case - Since we moved to NC all of my cosmetic bags are in storage somewhere. Right now all of my makeup is in my purse and I can never find the lip gloss I am looking for!
http://www.toryburch.com/printed-cosmetic-case/12149081.html?start=7&dwvar_12149081_color=452&cgid=accessories-small-accessories

By Jennifer Shelton

Tuesday, April 22, 2014

Cleaning Out The Fridge - Chicken with Brussels Sprouts

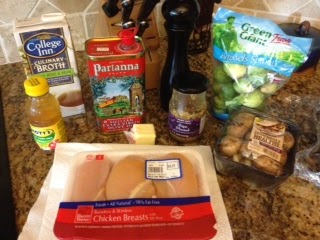
This morning I was making breakfast and noticed that I had some brussels sprouts that I bought and forgot to use. I also had some chicken in the freezer and decided to look on Pinterest for some recipe ideas. I found this great recipe that myrecipes.com posted for chicken with brussels sprouts!


http://www.pinterest.com/pin/167196204890509198/
I had most of the ingredients on hand and only had to make a few substitutions!! I didn't have apple cider so I used apple juice, and then to the brussels sprouts I cut up two apples. I am sure you can make this side dish and also serve with pork.

Ingredients


  • 2 tablespoons olive oil, divided 
  • (6-ounce) skinless, boneless chicken breast halves
  • 3/8 teaspoon salt, divided
  • 1/4 teaspoon freshly ground black pepper
  • 3/4 cup fat-free, lower-sodium chicken broth, divided
  • 1/4 cup unfiltered apple cider (I used apple juice since I didn't have apple cider)
  • 2 tablespoons whole-grain Dijon mustard 
  • 2 tablespoons butter, divided 
  • 1 tablespoon chopped fresh flat-leaf parsley (I didn't have this on hand so I omitted)
  • 12 ounces Brussels sprouts, trimmed and halved
  • 2 Apples cubed (not in the original recipe but I added)

First pre-heat your oven to 450 degrees. I used my Le Creuset pan to sear the chicken for 3 minutes in olive oil. I also salted/peppered the chicken the on each side before putting it in the oven to cook for 10-12 minutes. Be VERY VERY VERY careful when removing this pan. I had a normal potholder on my hand and it was too hot for me to hold. I had to use a glove potholder and then a regular pot holder.


In a separate pan, eat remaining 1 tablespoon oil and 1 tablespoon butter in a large nonstick skillet over medium-high heat. Add Brussels sprouts and apples; sauté 2 minutes or until lightly browned. Add remaining 1/8 teaspoon salt and 1/4 cup broth to pan; cover and cook 4 minutes or until crisp-tender.

Remove chicken from pan; keep warm. Heat pan over medium-high heat. Add 1/2 cup broth and cider (I used apple juice); bring to a boil, scraping pan to loosen browned bits. Reduce heat to medium-low; simmer 4 minutes or until thickened. Whisk in mustard, 1 tablespoon butter, and parsley (if you have it!). 


I also served rice pilaf with the meal! It was delish!!


I could also see making this recipe with pork chops or pork loin as well! Definitely check this recipe out and let me know how you make this as well!

Happy Pinning!

By Jennifer Shelton

Living Social - Neiman Marcus Last Call

Only a few minutes left but Living Social for $22 you can get a $50 gift card to Last Call at Neiman Marcus! Not to mention they have Jack Rogers sandals for $59. If you are not a member sign up here!
https://www.livingsocial.com/deals/1113955-50-to-spend-online-at-neiman-marcus-last-call?ref=share-post_purchase-copy_box-web-deals&rui=5110596&rpi=158577111

By Jennifer Shelton

Monday, April 21, 2014

Most Amazing Bloody Mary Ever!!

So I was just on Pinterest and had to share this picture. I may have to plan a trip to 

Sobelman's Pub & Grill in Milwaukee just for this drink. 


And I thought Stephanie's on Newbury in Boston had a crazy bloody mary! This is a drink and a feast in one!! 

http://www.pinterest.com/pin/509188301592657708/

Do you know of any other places that have crazy bloody mary's that are a must have? 
By Jennifer Shelton

My Husbands Instruction Manual

When my husband and I first started dating he was craving meatloaf one night, and pulled out a binder. I asked him what it was and it was a collection of all his favorite foods his Mom used to make. One year for Christmas she printed out all of his favorite recipes and put them in a binder as a Christmas present. Isn't this the cutest idea ever?


My mother-in-law had hand surgery today so I wanted to do something special for her and decided to go to my husband's instruction manual to find a home cooked meal for her. Not to mention something that she didn't have to use a knife for. This is a recipe that her mother used to make for her. The key ingredient according to my father-in-law is the 80% lean meat!! As he says you want a layer of grease at the bottom of the pan while cooking. Good thing I knew this! Otherwise I may have tried to pass ground turkey instead of ground beef.

 The ingredients are simple and most of which you should have around the house.

  • 2lbs Ground Beef (80% lean)
  • 1 sleeve of saltine crackers crushed (I crushed in a plastic bag)
  • 1/2 Chopped Green Pepper 
  • 1/2 Chopped Red Pepper
  • 1 Chopped Medium Onion
  • 2 Eggs
  • 3/4 Cup of Milk
  • Salt and Pepper
  • Ketchup

(I cheated here and bought a pre-chopped fajita mixture for the peppers and onions!!)

Don't forget to take off your rings before you start making this recipe! You don't want ground meat stuck in between your jewels!!

In large bowl, mix ground beef, onion, green and red pepper, eggs and milk. In a plastic bag, crush crackers until fairly fine and uniform in size. Add crackers to the meat mixture, along with salt and pepper. The key here is to NOT over mix the meat. You want to make sure it is combined but you don't want to handle the meat too much. 

Grease a baking dish, put meat mixture in baking dish and form into a log shape. Pour ketchup on top. Add about a 1/2 inch of water to baking dish, so the meatloaf is like an island. 

Bake at 350 degrees for about 45-60 minutes. Make sure to cut into the middle and check for doneness. You don't want any pink in the inside!

And Voila! You have Paul's instruction manual meatloaf! I served with some homemade mashed potatoes and corn. 

Since my mother-in-law can't use her hand I also prepared for her some chicken salad for lunch! This is also from my husband's instruction manual. I chopped 2 cooked chicken breasts, added some mayo, pecans, celery, Craisins, and pepper. Super simple to make and now she has lunch for the next few days!! I forgot to mention I also brought her some bread as well to make sandwiches.


Last but not least I also made her Lemon Poppy and Coconut Choclate scones to eat for breakfast. I included some lemon curd as well to eat along with the scones. However, I forgot to take pictures!!

I know these recipes didn't come from Pinterest but I thought I would share some family recipes!

Tomorrow I am going to make my in-laws baked ziti with pesto! Super excited to try out this new recipe and I will make sure to report back!

Happy Pinning!!
By Jennifer Shelton

My Southern I'Dos - Dessert Time

I am not sure if it is because I ate so many sweets yesterday, or the fact that I am craving them now that I decided to write a post about my dessert table at my wedding.

A few years ago we went to a wedding and instead of doing traditional cake, they passed around mini milkshakes, cake pops and ice cream sandwiches. Both my husband and I thought that it was the best idea ever. Not to mention you can always find me on the dance floor by the time the cake is being served and I always miss out.

Here are some of my pins I used for inspiration for my dessert table!!

http://www.pinterest.com/pin/167196204889071134/
 Even though we were having a dessert table we wanted to make sure we did have a cake to cut.
http://www.pinterest.com/pin/167196204889002335/
http://www.pinterest.com/pin/167196204887205903/
http://www.pinterest.com/pin/167196204890337826/

 The dessert table from Ryan Reynolds and Blake Lively's wedding! I guess good minds think alike!
http://www.pinterest.com/pin/167196204889319750/

http://www.pinterest.com/pin/167196204887579722/
Of course we had to put our own spin on the dessert table. So we went with miniature pies for guests since we wanted to have a backyard bbq feel to our wedding. Then we ordered mini canolis since my husband and I met and lived in the North End of Boston. If you aren't familiar with Boston that is the little Italy section of the city. My husband is from Ohio so of course we had to have buckeyes on the table, and last but not least we had a cookie jar full of Oreos!! My husband and I met at The Sail Loft on Boston's waterfront and at the bar they always have a cookie jar full of Oreos! So of course we needed to incorporate that detail into our dessert table. We also had our caterer make us a small cake that we could cut for the cake cutting!! Here are some pictures from our dessert table!

I found these great signs at Paper Source that I used all over the wedding. You can't see in the picture but it says Love Is Sweet. Also, my caterer had farm table toppers made. We were able to use these at our wedding and save lots of money!! 
We also used the bridesmaid bouquets to add more flowers to the table. In the framed picture is my husband and I in front of the The Sail Loft. Where we met!
 I would have loved to ship canoli's down from the North End in Boston, but since our wedding was on a Sunday we weren't sure how they would have held up. Instead we went to the next best thing! The Whole Foods in Mount Pleasant! That is our little secret!
Ohio Buckeys from Malleys in Ohio. Malleys has the best chocolates! Not to mention my sister-in-law worked there in high school. I actually have a HUGE Malley's chocolate bunny that is calling me right now!
Hamby's Catering created all of the mini-pies and tarts for our wedding. 

 Picture of our cake! It was extremely simple and exactly what we wanted. We had a few flowers decorating the sides, and then a burlap flower on top. The flower was actually a decoration on a Christmas present from my mother-in-law!!
 I saw these forks on Etsy and had to have! I put them on my Christmas list and my sister-in-law ordered them for me! I was so excited. They were engraved with Mr and Mrs on them too! My friend Lauren made us the pink napkin which she gave to me as a shower present. The cake plate we used was a pink depression glass that we had. And my mother-in-law bought us the Kate Spade cake serving knives as well!
 We received Kate Spade champagne glasses as a wedding present. Obviously this is a before picture because all night I had a glass of bubbly in my hands!!

 I found these small chalkboard signs at World Market and used them ALL over our wedding! You can also get a glimpse of the chevron bags we had for guests to take home food at the end of the night. The bags had our monogram on them as well!
 You may ask what is this? Well this is the Groom's cake. We are slightly obsessed with our cat and since he couldn't be at the wedding (even though he owns a bow tie) we had to incorporate him somehow! My Mother-in-Law ordered this cake for the rehearsal dinner but it was way too fabulous to cut into. So our Armondo cake also made an appearance at our wedding. Not only do we have a cat we love, my husband is slightly obsessed with his salt water fish tank.
 This is the original picture that my mother-in-law gave the bakery to base the cake off of. This is one of the many Halloween costumes we have for Armondo. He is such a natural in front of the camera!


 Last but not least a picture of my husband and I cutting our wedding cake!!

All right I am off to eat some of my Malley's chocolate bunny!

Happy Pinning!!
By Jennifer Shelton